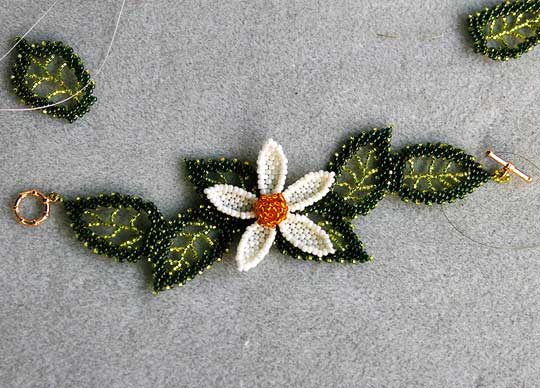
I made this bracelet from the picture posted in the “Your Work” section of Bead & Button Magazine, Issue 102 from April 2011. The piece is created by Michelle Albertella from Encinitas, CA.
My friend Alicia and I were very impressed with this gorgeous design. We drooled over the picture for about a day and decided to make it.
There were no instructions in the magazine, but the article mentioned that the leaves were made using St.Petersburg chain and the petals are brick stitch. (I later found that Michelle sells it here as a pattern.)
First order of business was to make 8 leaves.
I’ve made a fair share of Russian Leaves in my life, but those are done in Peyote stitch resulting in a more solid leaf with a thicker outer edge. The St.Petersburg chain leaves used in this design are lacier and more delicate. We really liked that look.
I have some experience with St.Petersburg chain, too. In the introduction to the first St.Petersburg chain project I’ve attempted, the writer claimed that by the time I was through, I’d know the stitch backwards and forwards. The project delivered. I did learn the stitch. But I think it also shaved a few months off my life expectancy in the process…
We looked up instructions for St.Petersburg chain leaves and found some from About.com. Very helpful, thank you very much. Takes a little bit of getting used to, following instructions broken into 16 tiny pages — they do want to maximize their annoying ads — but it’s there and it’s free.
It took me the better part of the evening to complete the first leaf. The beginning of the instructions threw me for a loop. It positions the stop bead in the center of the thread and uses 2 needles, since the leaf is stitched from the top down. So the first steps is to make the little leaf tip.
From there on, you do straight-forward St.Petersburg chain for a few rows to make one side of the leaf with one needle, then go back to the top to make the other side with the second needle. Then connect the sides by stitching a 2 row base using a pretty peculiar method, which I think could be improved on, but it worked out.
My problem with this kind of design is that I’m a very tight beader, but there is no way to make the beadwork tight here. It kind of flops and twists around in your hands and makes you bonkers. I really had to work on staying calm. However, once the sides are connected, the leaf sort of firms up. So that was a relief.
Sadly, my friend Alicia couldn’t make it happen. She gave up after the first leaf, which in fairness came out kind of cockeyed. But she made a killer braided bracelet instead!
I went ahead alone and struggled through. But really from the first leave on, it was easy.
Once you have made the necessary number of leaves (eight for an average wrist), they are sewn together, base to side, as shown in picture: four facing left and four facing right. This means that the two leaves in the center of the bracelet are sewn base to base. And this junction is where you attach your flower.
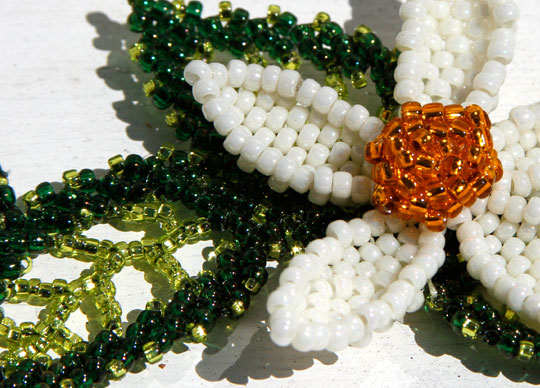
The flower petals were done with brick stitch and are very easy. Ana Garcia, my favorite bead teacher, taught us the technique to make them longer or shorter, so that was no problem. The petals are sewn together at one tip to form a flower.
The center of the flower was done from the middle out, starting with three 11° beads, and peyote stitching the beads in a circle with one increase. When you have a big enough circumference, sew through the top beads in the last row and pull. It makes a ball with an open base that is attached to the center of the flower.
The bracelet looks so cute. It’s very girlie. I just adore it! And it’s actually easy to wear. Initially, I thought it would catch on everything, but it’s behaving.
My tip would be not to make it too long. It should just fit; otherwise, it spins around your wrist and inevitably drops the flower, which is heavier, to the pulse point on the wrist and puts the clasp, which is lighter, out for display.
I myself had to take two leaves off to shorten the bracelet. Those are the ones to the side of the bracelet in the picture. Maybe I’ll use them for a necklace…. (Alicia would say I’m out of my mind.)
I completed the bracelet about 2 weeks ago, and just now, looking at the picture in the magazine that I shamelessly copied, I realized something disturbing. I’ve studied the picture in detail, I even counted the beads. But what I failed to notice is that the original flower had six petals. Poor mine has only five.
We look, but do we really see?
Leave a Reply